GIF for GitHub README: How to Record and Embed Demo Clips
How to record and embed GIFs in GitHub READMEs, PRs, and issues on Mac. Covers tools, file size limits, embedding syntax, and upload tips.
A GIF in a GitHub README shows what your code does without requiring video infrastructure. GitHub renders animated GIFs inline — no video player, no external hosting required for files under 10MB, no plugins. Reviewers see the demo without leaving GitHub.
This guide covers how to record a quality GIF on Mac, stay under GitHub's file size limit, embed it correctly in a README, and use GitHub's CDN to avoid bloating your repository.
Why GIFs work well in GitHub#
GitHub supports animated GIFs natively in READMEs, issues, pull requests, and wiki pages. They render everywhere GitHub markdown renders — including the mobile app.
Compared to screenshots: a GIF shows multi-step interactions. Clicking through a modal flow, submitting a form, triggering an animation — none of that lands in a static image.
Compared to video: GIFs play automatically with no video player. They render inline in PR descriptions where MP4 embeds aren't supported (README files don't support embedded video; issues and PRs do, but only on paid plans above a certain size).
The trade-off: GIFs have no audio, loop indefinitely, and degrade in quality as file size increases. They're suited for short, visual interactions — not narrated walkthroughs.
GitHub's file size limit#
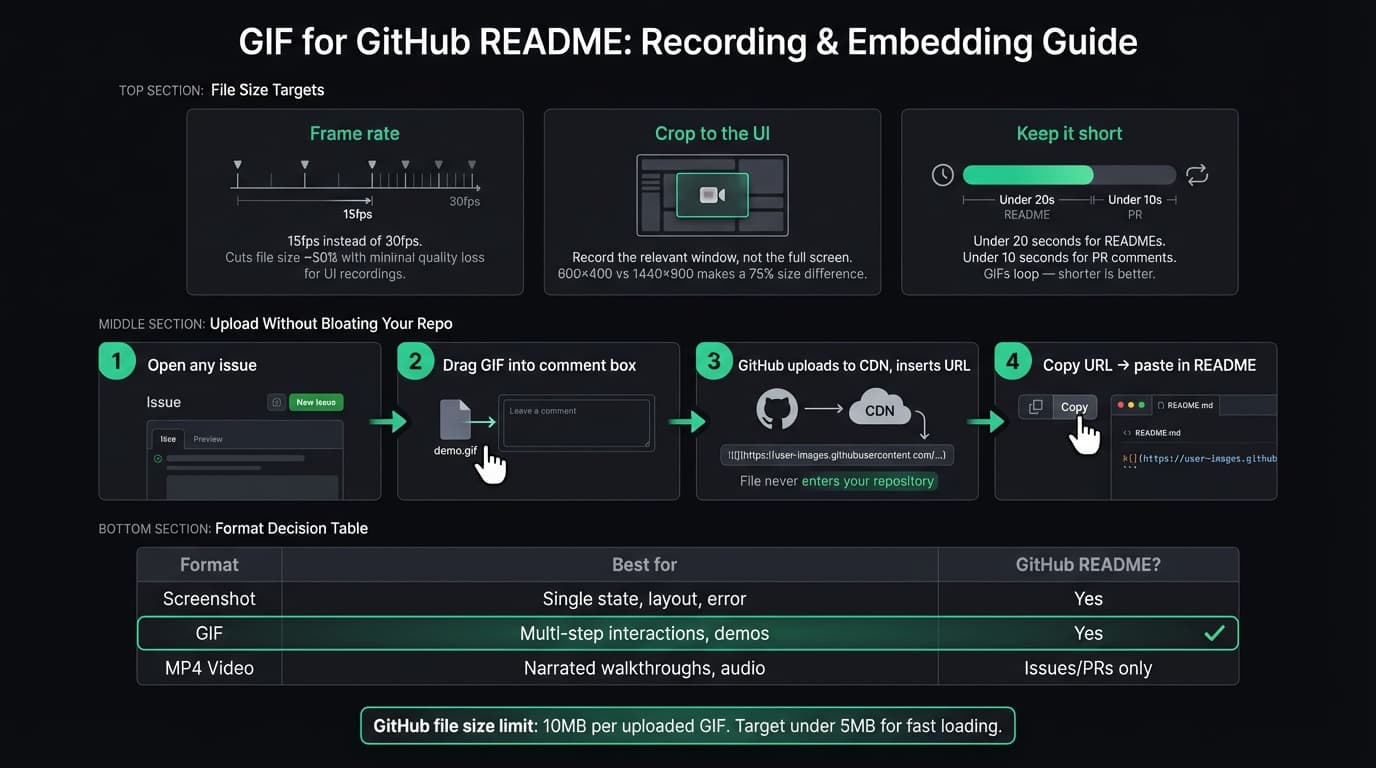
According to GitHub's documentation on attaching files, the maximum file size for images and GIFs uploaded via drag-and-drop to issues, PRs, and comments is 10MB. Files over that limit are rejected at upload.
For GIFs committed directly to your repository, there's no hard enforcement, but large committed files slow down git clone for everyone who clones the project. Uploading to GitHub's CDN (covered below) avoids this.
Practical targets:
- Under 5MB for most README demos
- Under 3MB if the repo is cloned frequently (open source projects)
- Under 10MB if using drag-and-drop upload to issues/PRs
Continue reading
GIFs That Actually Look Good
Record with auto-zoom, export as GIF. Perfect for docs, READMEs, and pull requests.
Recording settings that keep GIFs small#
Three settings drive GIF file size: frame rate, recording area, and duration.
Frame rate: 15fps. 30fps doubles the file size with minimal quality gain for click-based UI. Most interface interactions don't involve fast motion. 15fps is the standard for documentation GIFs.
Crop to the relevant area. Recording a 600×400 window instead of a 1440×900 full screen cuts file size by roughly 75% before any other compression. It also makes the demo easier to follow — no visual noise from the rest of your desktop.
Keep it short. Under 20 seconds for README demos. Under 10 seconds for PR comments where reviewers are scanning. GIFs loop automatically; an 8-second clip showing one interaction is more useful than a 45-second walkthrough that loses people on the second loop.
Rough size estimates at 15fps:
- 600×400, 10 seconds → roughly 1-3MB depending on content movement
- 800×500, 15 seconds → roughly 3-6MB
- 1000px+ wide at 30fps for 20+ seconds will likely exceed 10MB
Tools to record GIFs on Mac#
Kap (free, open-source) — Records a selected area and exports directly to GIF, MP4, or WebM. Lives in the menu bar. For GitHub documentation, Kap is the fastest path: select area, record, export GIF. No account required, no watermark. The Kap GitHub repository shows it's still maintained.
Rekort ($79 lifetime, $9/month) — Records with auto-zoom on click and exports as GIF or MP4. If your demo involves clicking through a UI and you want viewers to see clearly what's being clicked, Rekort zooms in automatically at every click. The exported GIF includes the zoom — no editing required. See the GIF screen recorder for Mac guide for a full tool comparison.
Gifox — Paid (~$15). More compression control than Kap. Useful if you're optimizing aggressively for file size and want precise quality settings. Good menu bar app experience.
LICEcap — Free, cross-platform. Works fine but the interface is dated. On Mac, Kap is the cleaner option for the same use case.
For most developers doing GitHub documentation: Kap for quick captures, Rekort when auto-zoom on click matters.
How to embed a GIF in a README#
Standard markdown image syntax:

Or with an absolute URL (GitHub CDN or external host):

GitHub flavored markdown also accepts HTML when you need to control display size:
<img src="./assets/login-demo.gif" alt="Demo of the login flow" width="600" />
The width attribute scales the displayed size without resampling. Useful when your recording is at 2x Retina resolution and renders too large at 100%.
One thing to watch: if your GIF path starts with ./ or is relative, it only works in the context where that relative path resolves. For READMEs at the repository root, ./assets/demo.gif works fine. For docs in subdirectories, use absolute paths from the repo root or a full URL.
Upload to GitHub's CDN without committing the file#
Committing GIFs to your repository adds their full size to every git clone. For active open source projects with many contributors, a handful of 5MB GIFs in the commit history matters.
The alternative: host the GIF on GitHub's CDN without adding it to the repo at all.
- Open any issue in your repository (create a throwaway issue if needed).
- Drag the GIF file into the comment text box. Do not submit the issue.
- GitHub uploads the file to their CDN and inserts a markdown image URL into the comment field, formatted like
https://github.com/user/repo/assets/.... - Copy that URL before closing.
- Use it in your README, docs, or wiki.
The GIF is hosted on GitHub's infrastructure and persists as long as the repository exists. Your repository size doesn't increase. git clone is unaffected.
This same trick works for PR descriptions, review comments, and wiki pages — any GitHub surface that accepts drag-and-drop file upload.
Adding GIFs to pull requests#
GIFs in PR descriptions give reviewers context before they read the diff. A 10-second clip showing the before/after behavior of a UI change communicates more than most written PR descriptions.
Three ways to add a GIF to a PR:
Drag and drop — In the PR description or comment editor, drag a GIF into the text area. GitHub uploads it and inserts the markdown automatically.
Paste from clipboard — Some recording tools (including Kap) let you copy the output to clipboard. Pasting into GitHub's editor works the same as drag-and-drop.
Type the markdown manually — If you already have a URL from a previous upload or external host, add  anywhere in the PR body.
For PR GIFs specifically: show one interaction per clip. If the PR covers three features, use three short GIFs rather than one long one. Reviewers scan; tight, focused clips land better than long walkthroughs.
GIF vs screenshot vs video#
| Format | Best for |
|---|---|
| Screenshot | Single state, layout, error message |
| GIF | Multi-step interaction, state transitions, short demos |
| Video (MP4) | Narrated walkthrough, audio demo, anything over 30 seconds |
GitHub supports embedded MP4 video in issues and pull requests (drag-and-drop, up to 100MB on paid plans). README files don't support embedded video — GIFs remain the practical choice for animated content in READMEs.
For a broader look at GIF recording on Mac — including GIPHY Capture, FFmpeg workflows, and tool comparisons — see GIF screen recorder for Mac. For the step-by-step on recording GIFs from scratch, see how to record a GIF on Mac and screen to GIF on Mac.
Ready to record?
Rekort auto-zooms every click so your screen recordings look professional. No video editing required.
Download for MacmacOS 14+ · From $9/month or $79 lifetime