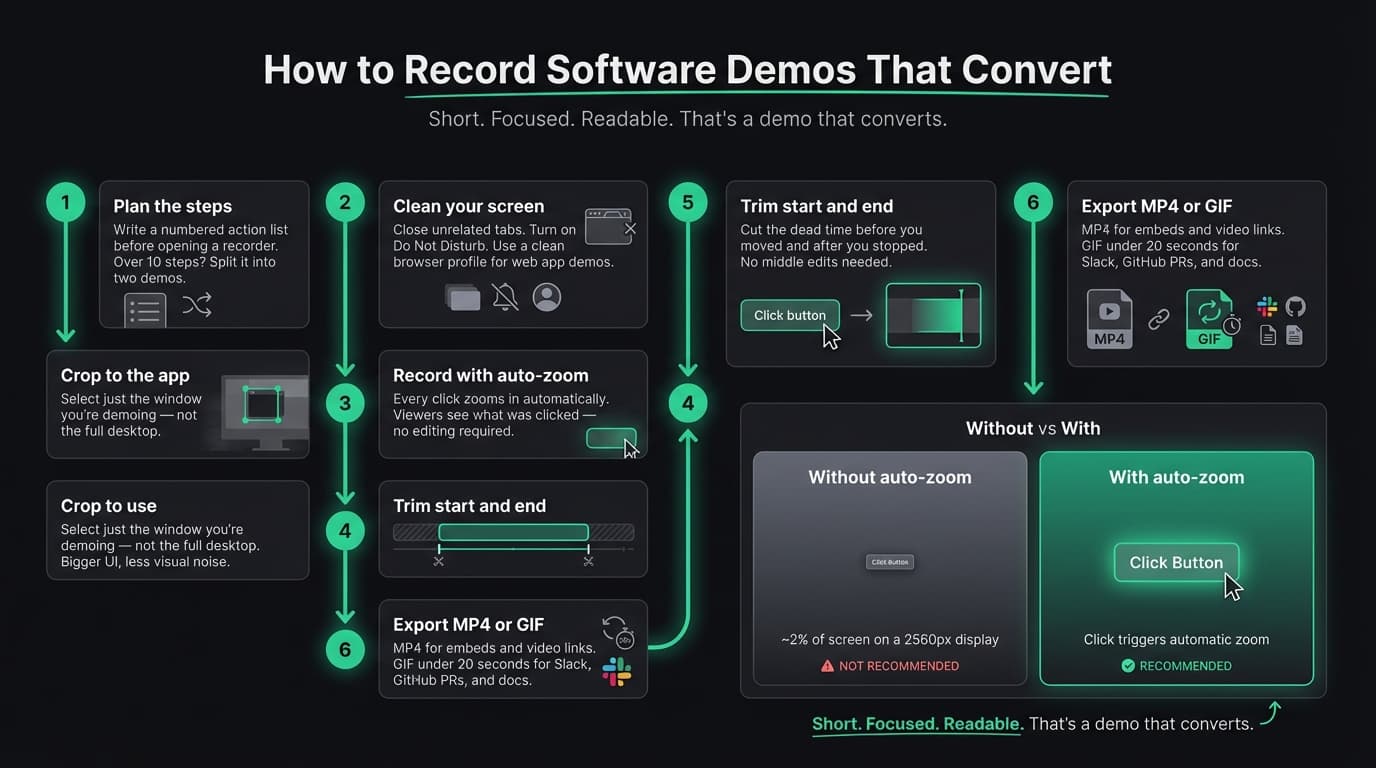
How to Record Software Demos That Convert
How to record software demos that are short, readable, and worth watching — without spending time in a video editor between takes.
Software demo recording fails in one of two ways: the demo is too long and viewers drop off, or the UI is unreadable and viewers can't follow along. Fix both, and the recording does its job — shows a clear value, quickly, without losing anyone.
This guide covers how to plan, record, and export software demos that hold attention, without a video editing session between the recording and publishing.
What makes a demo convert#
A demo converts when the viewer understands the value before they lose interest. That breaks down into four things:
Show the outcome first. Don't start with the login screen and walk forward. Start with the moment the product works — a result appearing, a form submitting, a workflow completing — then walk back to how to get there. Viewers need a reason to keep watching.
One workflow per demo. A full product walkthrough is hard to follow. A demo of one specific feature, showing one specific result, is easy to follow. One workflow, one recording.
Keep it under 3 minutes. For a feature clip, under 90 seconds. If it takes longer to explain, split it into two recordings.
Make the UI readable. On a 2560x1600 MacBook display, a standard screen recording captures everything at native resolution. Viewers watching on a 1080p screen — or in a Notion doc, or embedded in an email — can't read the text or see what you're clicking. A button that takes up 2% of your screen becomes three pixels on theirs.
Zoom solves the last problem. Without it, you either add manual zoom keyframes in a video editor (which takes 20-30 minutes per recording), or you ship a demo that viewers have to squint at.
Continue reading
Product Demos Without the Editing
Record a walkthrough and Rekort handles the zoom. Export a polished demo in minutes.
Step 1: Plan the steps before you open a recorder#
Write a numbered list of actions before you record. Not a script — just the steps:
1. Click "New project"
2. Name it and hit Enter
3. Click "Add integration"
4. Select GitHub, authenticate
5. Watch the sync complete
If your list has more than 8-10 steps, the demo is too long. Cut or split it.
This matters because you can't edit the middle of a recording without a video editor. You can trim the start and end, but a fumble in the middle means a re-take. A clear step list reduces fumbles.
Step 2: Clean your screen#
Close everything unrelated to the app you're demoing:
- All other browser tabs — use a dedicated window or a clean browser profile
- Notifications — turn on Do Not Disturb before every take
- Desktop files — move them to a folder first
- Extensions — disable browser extensions that show up in recordings
For web apps, a clean browser profile with no bookmarks bar and no extensions makes the recording look intentional. The default profile with 40 pinned tabs doesn't.
Step 3: Select a tight recording area#
Don't record your entire screen. Use your recorder's area selection to crop to just the app or window you're demoing.
A tight crop makes the UI larger relative to the canvas, which means text is more readable without any zoom at all. It also removes visual noise that pulls the viewer's eye away from the action.
If the app window is 1200px wide, record 1200px — not the full 2560px desktop around it.
Step 4: Record with auto-zoom on#
Auto-zoom is the single feature that most changes whether a software demo is watchable.
When you click a button, the recording zooms in automatically to show exactly what you clicked — centered, readable, close up. The viewer doesn't need to squint or rewind. You don't need to add manual keyframes afterward.
Two Mac apps do this during recording:
- Rekort — Records your screen and zooms into every click automatically. $79 one-time or $9/month. No webcam overlay or custom backgrounds, but the zoom-on-click workflow is the same as Screen Studio.
- Screen Studio — More features: camera overlay, custom backgrounds, cursor effects. $229 one-time or $29/month (as of March 2026). Better choice for daily polished video production.
If you're using QuickTime, Loom, or a recorder without zoom, you'll need to add manual zoom keyframes in a video editor — or accept a flat recording. For a comparison of all the options, see our guide to screen recording with zoom.
Step 5: Record the demo#
With the area selected, click record and walk through your steps. A few things to watch:
Pause between steps, not during them. Wait until an action completes — page loaded, modal closed, result visible — before moving to the next step. Pausing mid-action confuses viewers because they can't tell what they're looking at.
Move the mouse deliberately. Go to the target, click, wait for the result, move on. Constant mouse movement is distracting in a recording, especially when zoom follows the cursor.
Record a test take first. Thirty seconds, watch it back. Check that the crop is right, the audio levels aren't clipping, and the zoom is triggering where you expect. Then do the real take.
Narrate if the workflow is complex. For multi-step flows, speaking the steps aloud helps viewers follow. For simple feature demos, letting the UI tell the story is often cleaner — especially for recordings shared in docs or Slack where viewers may not have audio on.
Step 6: Trim and export#
After recording, trim the dead time at the start and end. Most recordings begin with a second or two before you moved the mouse and end with a pause after you stopped clicking.
Export format:
- MP4 — For website embeds, YouTube, LinkedIn, and sharing as a link. Plays everywhere, retains quality. Use this as the default.
- GIF — For Slack messages, GitHub READMEs and PRs, documentation, and anywhere a video won't autoplay inline. Keep GIFs under 20 seconds — file size grows fast, and long GIFs loop confusingly.
For documentation alongside written instructions, GIF tends to work better because it autoplays without any viewer action. For longer walkthroughs or anything with narration, MP4 is the right format.
Where to use the recording#
A focused demo, recorded once with auto-zoom, can do more than one job:
- Landing page — A short demo near the top of the page showing the core value, under 90 seconds, performs better than a hero section without video
- Onboarding email — A feature demo at the point in onboarding when someone needs to use that feature. Not a product tour — a specific action at the right moment.
- Documentation — GIFs inline with written steps, so users can follow along visually. See our screen recording for tutorials guide for tips on making documentation recordings.
- Changelog posts — A 30-second clip of a new feature is more useful than a paragraph describing it. See changelog videos for product updates for how to make these consistently.
- Sales follow-up — A personalized clip sent after a call reinforces what you showed and gives the prospect something to share internally with a buying committee.
The same recording can cover two or three of these placements. That's the leverage: a 5-minute recording session produces content that works across multiple channels.
The short version#
Plan the steps before you record. Clean your screen. Crop to just the app. Use a recorder with auto-zoom on click. Record deliberately. Trim. Export MP4 or GIF depending on where it's going.
The demo doesn't need to be polished in a video editor sense. It needs to be short, focused, and readable at normal viewing size. Those three things matter more than transitions, callouts, or animated text overlays.
For a broader guide to planning the script and structure of a product demo video, see how to make a product demo video.
Ready to record?
Rekort auto-zooms every click so your screen recordings look professional. No video editing required.
Download for MacmacOS 14+ · From $9/month or $79 lifetime
Related Articles
How to Make a Product Demo Video (Without a Video Editor)
16 min read
SaaS Demo Video: How to Make One That Actually Converts
7 min read
How to Record Training Videos (Without a Video Editor)
7 min read
Best Video Messaging Tools (Beyond Loom) in 2026
8 min read
Screen Recording with Zoom Effect: Why Clicks Should Pop
8 min read